一、Pytorch基本操作考察
使用𝐓𝐞𝐧𝐬𝐨𝐫初始化一个𝟏×𝟑的矩阵𝑴和一个𝟐×𝟏的矩阵𝑵,对两矩阵进行减法操作(要求实现三种不同的形式),给出结果并分析三种方式的不同(如果出现报错,分析报错的原因),同时需要指出在计算过程中发生了什么
1
2
3
import torchM=torch.Tensor([[1 ,2 ,3 ]]) N=torch.Tensor([[4 ],[5 ]])
tensor([[-3., -2., -1.],
[-4., -3., -2.]])
tensor([[-3., -2., -1.],
[-4., -3., -2.]])
tensor([[-3., -2., -1.],
[-4., -3., -2.]])
这三种写法分别使用 PyTorch 张量的减法运算符、torch.sub 函数和 Tensor.sub 方法,都会返回新的张量,不会原地修改 M 或 N。M 的形状为 (1, 3),N 的形状为 (2, 1);从末尾维度对齐后,每一维的大小相同或其中一个为 1,因此可以广播,结果形状为 (2, 3)。广播不需要先复制出两份完整的 (2, 3) 输入,运算结果则存放在新张量中。这里的 M.sub(N) 没有下划线;如果改为原地操作 M.sub_(N),就会因为不能把 M 的形状原地扩展为 (2, 3) 而报错。
①利用𝐓𝐞𝐧𝐬𝐨𝐫创建两个大小分别𝟑×𝟐和𝟒×𝟐的随机数矩阵𝑷和𝑸,要求服从均值为0,标准差0.01为的正态分布;②对第二步得到的矩阵𝑸进行形状变换得到𝑸的转置𝑸T T 求矩阵相乘
1 2 3 4 5 6 import torchP=torch.normal(mean=0.0 ,std=0.01 ,size=(3 ,2 )) Q=torch.normal(mean=0.0 ,std=0.01 ,size=(4 ,2 )) print (P)print (Q)
tensor([[-0.0082, 0.0247],
[-0.0128, 0.0130],
[ 0.0135, -0.0027]])
tensor([[-0.0089, 0.0103],
[ 0.0092, 0.0080],
[ 0.0016, 0.0104],
[ 0.0032, -0.0072]])
tensor([[-0.0089, 0.0092, 0.0016, 0.0032],
[ 0.0103, 0.0080, 0.0104, -0.0072]])
tensor([[ 3.2719e-04, 1.2144e-04, 2.4380e-04, -2.0380e-04],
[ 2.4757e-04, -1.4374e-05, 1.1514e-04, -1.3395e-04],
[-1.4752e-04, 1.0277e-04, -7.1371e-06, 6.1853e-05]])
给定公式𝑦3=𝑦1+𝑦2=𝑥^2+𝑥^3,且𝑥=1,利用学习所得到的Tensor的相关知识,求𝑦3对𝑥的梯度,要求在计算过程中,在计算𝑥3时中断梯度的追踪,观察结果并进行原因分析.
1 2 3 4 5 6 7 8 9 10 11 12 import torchx=torch.tensor(1.0 , requires_grad=True ) y1=x**2 with torch.no_grad(): y2=x**3 y3=y1+y2 y3.backward() print ("梯度dy3/dx:" , x.grad)
梯度dy3/dx: tensor(2.)
对于公式 y3 = x^2 + x^3,y1 = x**2 正常记录了反向传播的计算图;y2 = x**3 在 torch.no_grad() 上下文中计算,因此这里的 y2 不记录梯度,y2.requires_grad 为 False。离开该上下文后,y3 = y1 + y2 仍会记录通过 y1 回到 x 的梯度路径;调用 y3.backward() 时,y2 在这次反向传播中被当作常数。于是 x.grad 只得到 x^2 的导数 2x,在 x=1 时为 2.0。如果两项都正常追踪梯度,结果才是 2x + 3x^2 = 5.0。
二、动手实现 logistic 回归
要求动手从0实现 logistic 回归(只借助Tensor和Numpy相关的库)在人工构造的数据集上进行训练和测试,并从loss以及训练集上的准确率等多个角度对结果进行分析(可借助nn.BCELoss或nn.BCEWithLogitsLoss作为损失函数,从零实现二元交叉熵为选作)
首先,生成训练集和测试集
1 2 3 4 5 6 7 8 9 10 11 12 13 14 15 16 17 18 19 20 21 22 23 24 25 26 27 28 29 30 31 32 import torchimport numpy as npimport matplotlib.pyplot as pltnum_inputs = 2 x1 = torch.normal(2 * torch.ones(1000 , num_inputs), 1 ) y1 = torch.ones(1000 ) x2 = torch.normal(-2 * torch.ones(1000 , num_inputs), 1 ) y2 = torch.zeros(1000 ) train_index = 800 train_features = torch.cat((x1[:train_index], x2[:train_index]), 0 ).type (torch.FloatTensor) train_labels = torch.cat((y1[:train_index], y2[:train_index]), 0 ).type (torch.FloatTensor) test_features = torch.cat((x1[train_index:], x2[train_index:]), 0 ).type (torch.FloatTensor) test_labels = torch.cat((y1[train_index:], y2[train_index:]), 0 ).type (torch.FloatTensor) print (f"训练集大小: {len (train_features)} " )print (f"测试集大小: {len (test_features)} " )print ("数据集生成完毕。\n" )
训练集大小: 1600
测试集大小: 400
数据集生成完毕。
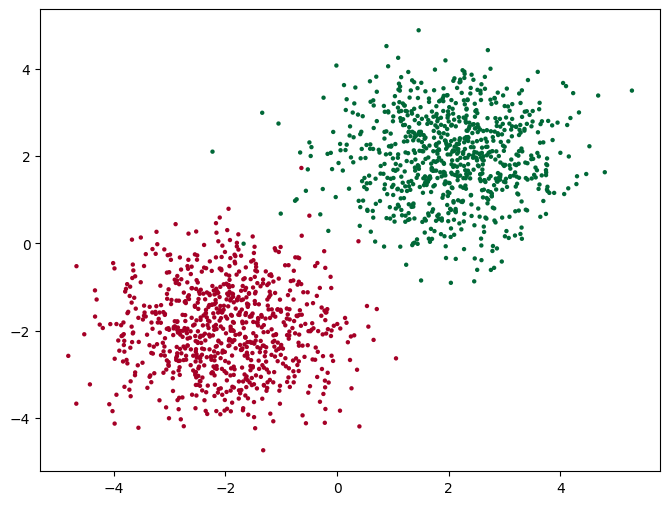
为了方便观察数据分布,这里进行训练集数据的可视化。
1 2 3 4 5 6 7 plt.figure(figsize=(8 , 6 )) plt.scatter(train_features.data.numpy()[:, 0 ], train_features.data.numpy()[:, 1 ], c=train_labels.data.numpy(), s=10 , lw=0 , cmap='RdYlGn' ) plt.show()
实验输出
为了方便进行小批量学习,定义数据迭代器
1 2 3 4 5 6 7 8 def data_iter (batch_size, features, labels ): num_examples = len (features) indices = list (range (num_examples)) np.random.shuffle(indices) for i in range (0 , num_examples, batch_size): j = torch.LongTensor(indices[i:min (i + batch_size, num_examples)]) yield features.index_select(0 , j), labels.index_select(0 , j)
定义模型、损失函数、优化器
1 2 3 4 5 6 7 8 9 10 11 12 13 14 15 def logistic_model (X, w, b ): logits = torch.mm(X, w) + b return 1 / (1 + torch.exp(-logits)) def bce_loss (y_hat, y ): y = y.view(y_hat.size()) epsilon = 1e-7 return -torch.mean(y * torch.log(y_hat + epsilon) + (1 - y) * torch.log(1 - y_hat + epsilon)) def sgd (params, lr ): for param in params: param.data -= lr * param.grad
定义评估函数来计算当前的准确率和平均损失
1 2 3 4 5 6 7 8 def evaluate_performance (features, labels, w, b, loss_fn ): with torch.no_grad(): y_hat = logistic_model(features, w, b) loss = loss_fn(y_hat, labels.view(y_hat.size())) predicted_classes = (y_hat > 0.5 ).float () accuracy = (predicted_classes == labels.view(predicted_classes.size())).float ().mean() return accuracy.item(), loss.item()
模型参数初始化,给w和b一个随机的初始值
1 2 3 4 5 6 w = torch.tensor(np.random.normal(0 , 0.01 , (num_inputs, 1 )), dtype=torch.float32) b = torch.zeros(1 ,dtype=torch.float32) w.requires_grad_(requires_grad=True ) b.requires_grad_(requires_grad=True )
tensor([0.], requires_grad=True)
训练模型
1 2 3 4 5 6 7 8 9 10 11 12 13 14 15 16 17 18 19 20 21 22 23 24 25 26 27 28 29 30 31 32 33 lr = 0.01 num_epochs = 20 batch_size = 50 train_losses, test_losses = [], [] train_accuracies, test_accuracies = [], [] for epoch in range (num_epochs): for X, y in data_iter(batch_size, train_features, train_labels): y_hat = logistic_model(X, w, b) l = bce_loss(y_hat, y) l.backward() sgd([w, b], lr) w.grad.data.zero_() b.grad.data.zero_() train_acc, train_loss = evaluate_performance(train_features, train_labels, w, b, bce_loss) test_acc, test_loss = evaluate_performance(test_features, test_labels, w, b, bce_loss) train_losses.append(train_loss) test_losses.append(test_loss) train_accuracies.append(train_acc) test_accuracies.append(test_acc) print (f'Epoch {epoch + 1 } , Train Loss: {train_loss:.4 f} , Train Acc: {train_acc:.3 f} , Test Loss: {test_loss:.4 f} , Test Acc: {test_acc:.3 f} ' ) print ("训练完成!\n" )
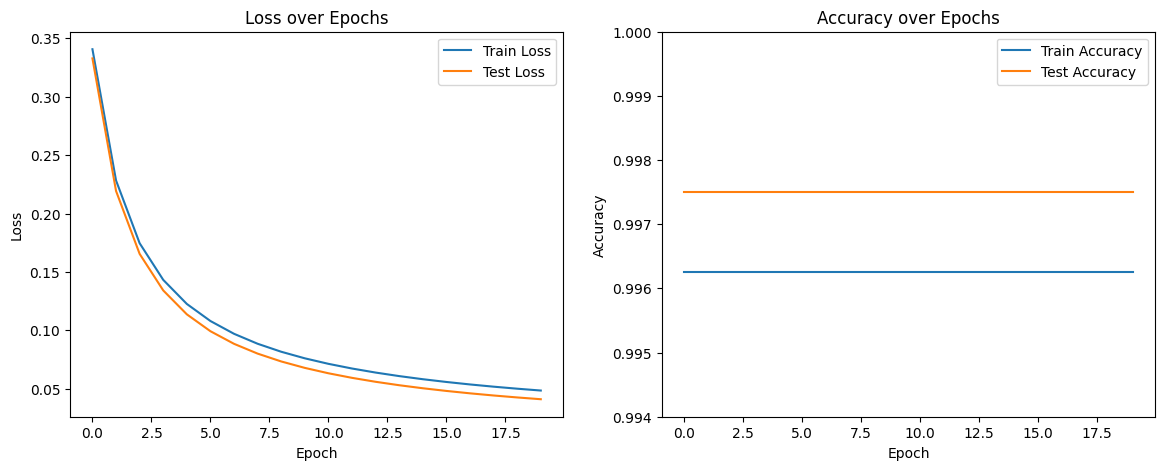
Epoch 1, Train Loss: 0.3407, Train Acc: 0.996, Test Loss: 0.3328, Test Acc: 0.998
Epoch 2, Train Loss: 0.2283, Train Acc: 0.996, Test Loss: 0.2193, Test Acc: 0.998
Epoch 3, Train Loss: 0.1746, Train Acc: 0.996, Test Loss: 0.1654, Test Acc: 0.998
Epoch 4, Train Loss: 0.1432, Train Acc: 0.996, Test Loss: 0.1341, Test Acc: 0.998
Epoch 5, Train Loss: 0.1226, Train Acc: 0.996, Test Loss: 0.1137, Test Acc: 0.998
Epoch 6, Train Loss: 0.1079, Train Acc: 0.996, Test Loss: 0.0992, Test Acc: 0.998
Epoch 7, Train Loss: 0.0970, Train Acc: 0.996, Test Loss: 0.0884, Test Acc: 0.998
Epoch 8, Train Loss: 0.0885, Train Acc: 0.996, Test Loss: 0.0800, Test Acc: 0.998
Epoch 9, Train Loss: 0.0816, Train Acc: 0.996, Test Loss: 0.0733, Test Acc: 0.998
Epoch 10, Train Loss: 0.0760, Train Acc: 0.996, Test Loss: 0.0678, Test Acc: 0.998
Epoch 11, Train Loss: 0.0713, Train Acc: 0.996, Test Loss: 0.0632, Test Acc: 0.998
Epoch 12, Train Loss: 0.0673, Train Acc: 0.996, Test Loss: 0.0593, Test Acc: 0.998
Epoch 13, Train Loss: 0.0638, Train Acc: 0.996, Test Loss: 0.0559, Test Acc: 0.998
Epoch 14, Train Loss: 0.0608, Train Acc: 0.996, Test Loss: 0.0529, Test Acc: 0.998
Epoch 15, Train Loss: 0.0581, Train Acc: 0.996, Test Loss: 0.0504, Test Acc: 0.998
Epoch 16, Train Loss: 0.0557, Train Acc: 0.996, Test Loss: 0.0481, Test Acc: 0.998
Epoch 17, Train Loss: 0.0536, Train Acc: 0.996, Test Loss: 0.0460, Test Acc: 0.998
Epoch 18, Train Loss: 0.0517, Train Acc: 0.996, Test Loss: 0.0442, Test Acc: 0.998
Epoch 19, Train Loss: 0.0500, Train Acc: 0.996, Test Loss: 0.0425, Test Acc: 0.998
Epoch 20, Train Loss: 0.0484, Train Acc: 0.996, Test Loss: 0.0410, Test Acc: 0.998
训练完成!
训练结束,画图分析学习成果
1 2 3 4 5 6 7 8 9 10 11 12 13 14 15 16 17 18 19 20 21 22 23 24 plt.figure(figsize=(14 , 5 )) plt.subplot(1 , 2 , 1 ) plt.plot(train_losses, label='Train Loss' ) plt.plot(test_losses, label='Test Loss' ) plt.title('Loss over Epochs' ) plt.xlabel('Epoch' ) plt.ylabel('Loss' ) plt.legend() plt.subplot(1 , 2 , 2 ) plt.plot(train_accuracies, label='Train Accuracy' ) plt.plot(test_accuracies, label='Test Accuracy' ) plt.title('Accuracy over Epochs' ) plt.xlabel('Epoch' ) plt.ylabel('Accuracy' ) plt.ylim(0.994 , 1.0 ) plt.legend() plt.show()
--- 正在绘制结果图表... ---
通过从零开始手动实现逻辑回归,结果显示,模型的损失(Loss)在最初几轮训练中就迅速下降并趋于稳定,同时训练集准确率(Accuracy)也快速达到了接近100%的水平。这成功地验证了手动实现的sigmoid函数、二元交叉熵损失以及梯度下降优化器是正确且有效的。
利用torch.nn 实现 logistic 回归在人工构造的数据集上进行训练和测试,并对结果进行分析,并从loss以及训练集上的准确率等多个角度对结果进行分析
准备数据
1 2 3 4 5 6 7 8 9 10 11 12 13 14 import torchimport numpy as npimport matplotlib.pyplot as pltimport torch.utils.data as Datafrom torch.nn import initfrom torch import nnbatch_size = 50 train_dataset = Data.TensorDataset(train_features, train_labels) train_loader = Data.DataLoader(dataset=train_dataset, batch_size=batch_size, shuffle=True ) test_dataset = Data.TensorDataset(test_features, test_labels) test_loader = Data.DataLoader(dataset=test_dataset, batch_size=batch_size, shuffle=False )
nn.Module搭建模型
1 2 3 4 5 6 7 8 9 10 11 12 from torch import nnclass LogisticRegressionNN (nn.Module): def __init__ (self, n_features ): super (LogisticRegressionNN, self ).__init__() self .linear = nn.Linear(n_features, 1 ) self .sigmoid = nn.Sigmoid() def forward (self, x ): x = self .linear(x) x = self .sigmoid(x) return x
初始化模型,定义损失函数,优化器
1 2 3 4 5 6 7 model = LogisticRegressionNN(num_inputs) criterion = nn.BCELoss() optimizer = torch.optim.SGD(model.parameters(), lr=0.001 )
定义评估函数
1 2 3 4 5 6 7 8 9 10 11 12 13 14 15 16 17 18 def evaluate_nn (loader, model, criterion ): model.eval () total_loss = 0 correct = 0 total = 0 with torch.no_grad(): for features, labels in loader: outputs = model(features) loss = criterion(outputs, labels.view(-1 , 1 )) total_loss += loss.item() * len (labels) predicted = (outputs > 0.5 ).float () total += len (labels) correct += (predicted == labels.view(-1 , 1 )).sum ().item() model.train() return correct / total, total_loss / total
训练模型
1 2 3 4 5 6 7 8 9 10 11 12 13 14 15 16 17 18 19 20 21 22 23 24 25 26 27 num_epochs = 20 train_losses_nn, test_losses_nn = [], [] train_accuracies_nn, test_accuracies_nn = [], [] for epoch in range (num_epochs): model.train() for features, labels in train_loader: outputs = model(features) loss = criterion(outputs, labels.view(-1 , 1 )) optimizer.zero_grad() loss.backward() optimizer.step() train_acc, train_loss = evaluate_nn(train_loader, model, criterion) test_acc, test_loss = evaluate_nn(test_loader, model, criterion) train_losses_nn.append(train_loss) test_losses_nn.append(test_loss) train_accuracies_nn.append(train_acc) test_accuracies_nn.append(test_acc) print (f'Epoch {epoch + 1 } , Train Loss: {train_loss:.4 f} , Train Acc: {train_acc:.3 f} , Test Loss: {test_loss:.4 f} , Test Acc: {test_acc:.3 f} ' ) print ("nn 模型训练完成!\n" )
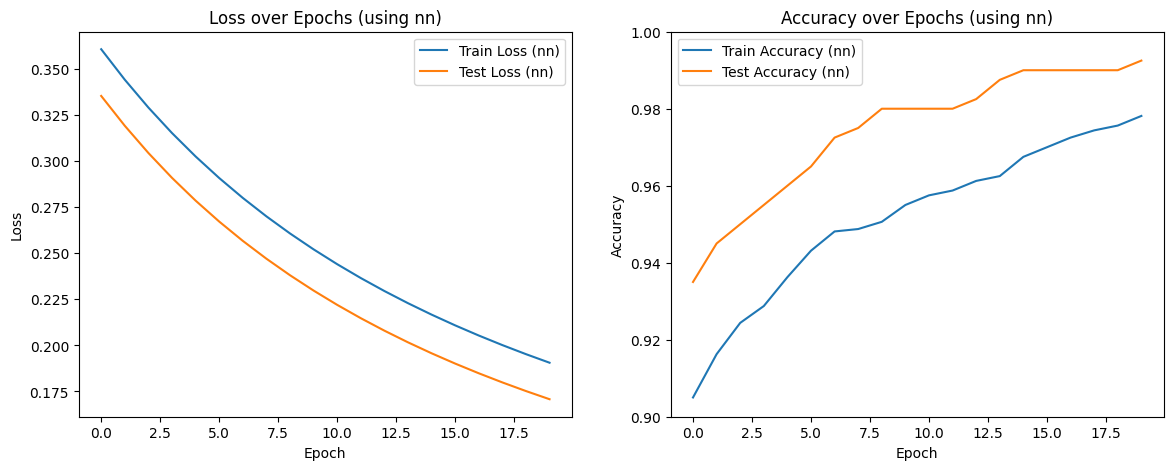
Epoch 1, Train Loss: 0.3608, Train Acc: 0.905, Test Loss: 0.3354, Test Acc: 0.935
Epoch 2, Train Loss: 0.3442, Train Acc: 0.916, Test Loss: 0.3192, Test Acc: 0.945
Epoch 3, Train Loss: 0.3291, Train Acc: 0.924, Test Loss: 0.3045, Test Acc: 0.950
Epoch 4, Train Loss: 0.3153, Train Acc: 0.929, Test Loss: 0.2910, Test Acc: 0.955
Epoch 5, Train Loss: 0.3026, Train Acc: 0.936, Test Loss: 0.2786, Test Acc: 0.960
Epoch 6, Train Loss: 0.2909, Train Acc: 0.943, Test Loss: 0.2672, Test Acc: 0.965
Epoch 7, Train Loss: 0.2801, Train Acc: 0.948, Test Loss: 0.2568, Test Acc: 0.973
Epoch 8, Train Loss: 0.2701, Train Acc: 0.949, Test Loss: 0.2471, Test Acc: 0.975
Epoch 9, Train Loss: 0.2608, Train Acc: 0.951, Test Loss: 0.2381, Test Acc: 0.980
Epoch 10, Train Loss: 0.2522, Train Acc: 0.955, Test Loss: 0.2298, Test Acc: 0.980
Epoch 11, Train Loss: 0.2441, Train Acc: 0.958, Test Loss: 0.2220, Test Acc: 0.980
Epoch 12, Train Loss: 0.2366, Train Acc: 0.959, Test Loss: 0.2148, Test Acc: 0.980
Epoch 13, Train Loss: 0.2295, Train Acc: 0.961, Test Loss: 0.2080, Test Acc: 0.983
Epoch 14, Train Loss: 0.2229, Train Acc: 0.963, Test Loss: 0.2017, Test Acc: 0.988
Epoch 15, Train Loss: 0.2167, Train Acc: 0.968, Test Loss: 0.1957, Test Acc: 0.990
Epoch 16, Train Loss: 0.2109, Train Acc: 0.970, Test Loss: 0.1901, Test Acc: 0.990
Epoch 17, Train Loss: 0.2054, Train Acc: 0.973, Test Loss: 0.1849, Test Acc: 0.990
Epoch 18, Train Loss: 0.2002, Train Acc: 0.974, Test Loss: 0.1799, Test Acc: 0.990
Epoch 19, Train Loss: 0.1953, Train Acc: 0.976, Test Loss: 0.1752, Test Acc: 0.990
Epoch 20, Train Loss: 0.1906, Train Acc: 0.978, Test Loss: 0.1708, Test Acc: 0.993
nn 模型训练完成!
训练结束,画图分析学习成果
1 2 3 4 5 6 7 8 9 10 11 12 13 14 15 16 17 18 plt.figure(figsize=(14 , 5 )) plt.subplot(1 , 2 , 1 ) plt.plot(train_losses_nn, label='Train Loss (nn)' ) plt.plot(test_losses_nn, label='Test Loss (nn)' ) plt.title('Loss over Epochs (using nn)' ) plt.xlabel('Epoch' ) plt.ylabel('Loss' ) plt.legend() plt.subplot(1 , 2 , 2 ) plt.plot(train_accuracies_nn, label='Train Accuracy (nn)' ) plt.plot(test_accuracies_nn, label='Test Accuracy (nn)' ) plt.title('Accuracy over Epochs (using nn)' ) plt.xlabel('Epoch' ) plt.ylabel('Accuracy' ) plt.ylim(0.9 , 1.0 ) plt.legend() plt.show()
使用torch.nn模块实现逻辑回归同样在人工数据集上获得了极高的准确率和极低的损失,其结果与从零实现版本高度一致。通过使用标准化模块高效地达到了同样的目标。
三、动手实现 softmax回归
要求动手从0实现 softmax回归(只借助Tensor和Numpy相关的库)在Fashion-MNIST数据
加载 Fashion-MNIST 数据集
1 2 3 4 5 6 7 8 9 10 11 12 13 14 15 16 17 18 19 20 21 22 23 24 25 26 27 28 29 30 31 32 33 34 35 import torchimport torchvisionimport torchvision.transforms as transformsimport numpy as npimport matplotlib.pyplot as pltimport timebatch_size = 256 transform = transforms.ToTensor() mnist_train = torchvision.datasets.FashionMNIST( root="./data" , train=True , download=True , transform=transform ) mnist_test = torchvision.datasets.FashionMNIST( root="./data" , train=False , download=True , transform=transform ) train_iter = torch.utils.data.DataLoader(mnist_train, batch_size=batch_size, shuffle=True ) test_iter = torch.utils.data.DataLoader(mnist_test, batch_size=batch_size, shuffle=False ) print ("数据集加载完成!\n" )
数据集加载完成!
拿出几张照片及其对应的标签进行可视化,直观感受模型要处理的输入及需要达到的目标
1 2 3 4 5 6 7 8 9 10 11 12 13 14 15 16 17 18 19 20 21 def get_fashion_mnist_labels (labels ): text_labels = ['t-shirt' , 'trouser' , 'pullover' , 'dress' , 'coat' , 'sandal' , 'shirt' , 'sneaker' , 'bag' , 'ankle boot' ] return [text_labels[int (i)] for i in labels] def show_fashion_mnist (images, labels ): _, figs = plt.subplots(1 , len (images), figsize=(12 , 12 )) for f, img, lbl in zip (figs, images, labels): f.imshow(img.view((28 , 28 )).numpy(), cmap='gray' ) f.set_title(lbl) f.axes.get_xaxis().set_visible(False ) f.axes.get_yaxis().set_visible(False ) plt.show() X, y = next (iter (train_iter)) show_fashion_mnist(X[0 :10 ], get_fashion_mnist_labels(y[0 :10 ]))
定义模型,损失函数,优化器,初始化模型参数
1 2 3 4 5 6 7 8 9 10 11 12 13 14 15 16 17 18 19 20 21 22 23 24 25 26 27 28 29 30 31 32 33 num_inputs = 784 num_outputs = 10 W = torch.tensor(np.random.normal(0 , 0.01 , (num_inputs, num_outputs)), dtype=torch.float32) b = torch.zeros(num_outputs, dtype=torch.float32) W.requires_grad_(requires_grad=True ) b.requires_grad_(requires_grad=True ) def softmax (X ): X_exp = torch.exp(X) partition = X_exp.sum (dim=1 , keepdim=True ) return X_exp / partition def net (X ): linear_output = torch.mm(X.view((-1 , num_inputs)), W) + b return softmax(linear_output) def cross_entropy (y_hat, y ): return -torch.log(y_hat.gather(1 , y.view(-1 , 1 ))) def sgd (params, lr, batch_size ): for param in params: param.data -= lr * param.grad / batch_size
定义评估函数
1 2 3 4 5 6 7 8 9 def evaluate_accuracy (data_iter, net_fn ): acc_sum, n = 0.0 , 0 with torch.no_grad(): for X, y in data_iter: acc_sum += (net_fn(X).argmax(dim=1 ) == y).float ().sum ().item() n += y.shape[0 ] return acc_sum / n
训练模型
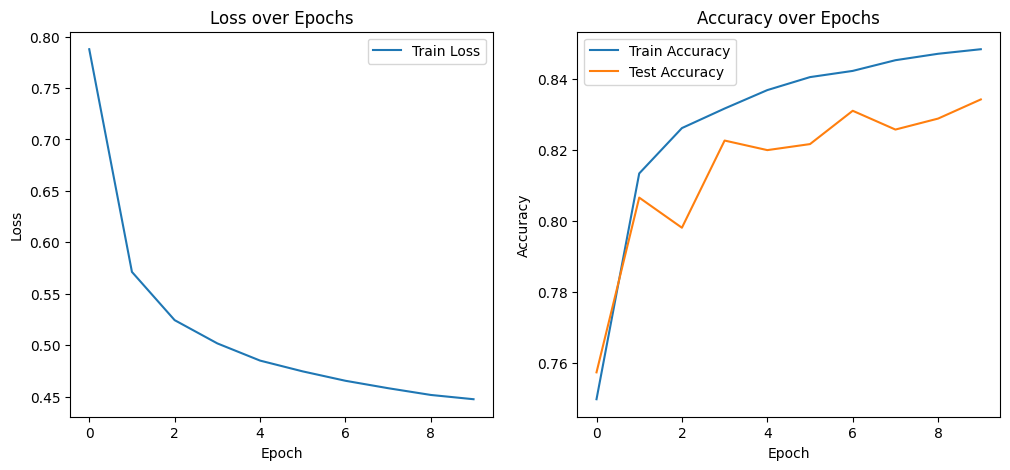
1 2 3 4 5 6 7 8 9 10 11 12 13 14 15 16 17 18 19 20 21 22 23 24 25 26 27 28 29 30 31 32 33 34 35 36 37 38 39 num_epochs = 10 lr = 0.1 train_losses, test_losses = [], [] train_accuracies, test_accuracies = [], [] def train_epoch (net, train_iter, loss, updater ): train_l_sum, train_acc_sum, n = 0.0 , 0.0 , 0 for X, y in train_iter: y_hat = net(X) l = loss(y_hat, y) l.sum ().backward() updater([W, b], lr, batch_size) W.grad.data.zero_() b.grad.data.zero_() train_l_sum += l.sum ().item() train_acc_sum += (y_hat.argmax(dim=1 ) == y).sum ().item() n += y.shape[0 ] return train_acc_sum / n, train_l_sum / n for epoch in range (num_epochs): train_acc, train_loss = train_epoch(net, train_iter, cross_entropy, sgd) test_acc = evaluate_accuracy(test_iter, net) train_accuracies.append(train_acc) train_losses.append(train_loss) test_accuracies.append(test_acc) print (f'Epoch {epoch + 1 } , Train Loss: {train_loss:.4 f} , Train Acc: {train_acc:.3 f} , Test Acc: {test_acc:.3 f} ' ) print ("训练完成!\n" )
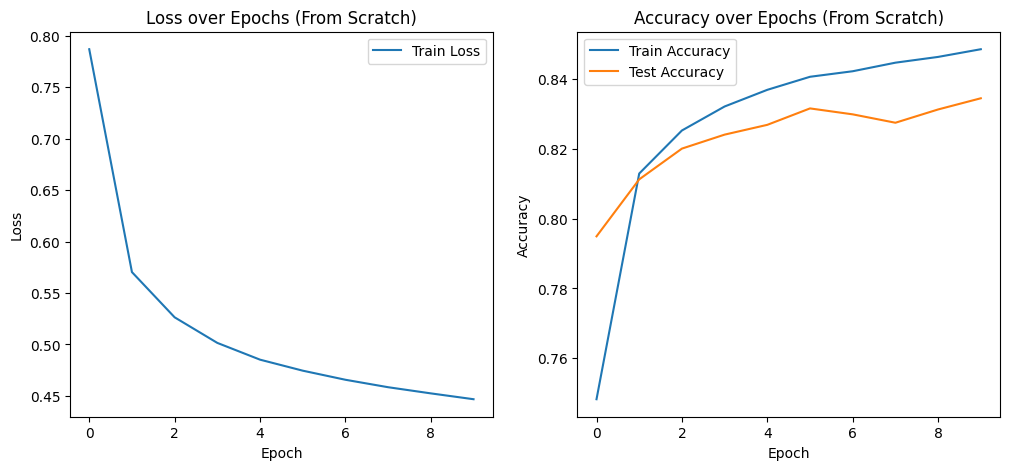
Epoch 1, Train Loss: 0.7870, Train Acc: 0.748, Test Acc: 0.795
Epoch 2, Train Loss: 0.5703, Train Acc: 0.813, Test Acc: 0.811
Epoch 3, Train Loss: 0.5263, Train Acc: 0.825, Test Acc: 0.820
Epoch 4, Train Loss: 0.5015, Train Acc: 0.832, Test Acc: 0.824
Epoch 5, Train Loss: 0.4852, Train Acc: 0.837, Test Acc: 0.827
Epoch 6, Train Loss: 0.4745, Train Acc: 0.841, Test Acc: 0.832
Epoch 7, Train Loss: 0.4656, Train Acc: 0.842, Test Acc: 0.830
Epoch 8, Train Loss: 0.4584, Train Acc: 0.845, Test Acc: 0.827
Epoch 9, Train Loss: 0.4524, Train Acc: 0.846, Test Acc: 0.831
Epoch 10, Train Loss: 0.4467, Train Acc: 0.848, Test Acc: 0.834
训练完成!
结果可视化分析学习结果
1 2 3 4 5 6 7 8 9 10 11 12 13 14 15 16 17 18 19 20 21 22 23 plt.figure(figsize=(12 , 5 )) plt.subplot(1 , 2 , 1 ) plt.plot(train_losses, label='Train Loss' ) plt.title('Loss over Epochs (From Scratch)' ) plt.xlabel('Epoch' ) plt.ylabel('Loss' ) plt.legend() plt.subplot(1 , 2 , 2 ) plt.plot(train_accuracies, label='Train Accuracy' ) plt.plot(test_accuracies, label='Test Accuracy' ) plt.title('Accuracy over Epochs (From Scratch)' ) plt.xlabel('Epoch' ) plt.ylabel('Accuracy' ) plt.legend() plt.show()
在Fashion-MNIST多分类任务上,从零实现的Softmax回归模型表现出了良好的学习能力。从结果损失曲线和准确率曲线图可以看出,模型的训练损失持续稳定下降,而训练集和测试集的准确率都在稳步攀升,这表明手动实现的softmax函数、多类交叉熵损失和优化算法能够有效工作。
利用torch.nn实现 softmax 回归在Fashion-MNIST数据集上进行训练和测试,并从loss,训练集以及测试集上的准确率等多个角度对结果进行分析
首先准备数据
1 2 3 4 5 6 7 8 9 10 11 12 13 14 15 16 17 18 19 20 21 22 23 24 25 26 27 28 29 30 31 32 33 34 35 import torchimport torchvisionimport torchvision.transforms as transformsimport numpy as npimport matplotlib.pyplot as pltimport timebatch_size = 256 transform = transforms.ToTensor() mnist_train = torchvision.datasets.FashionMNIST( root="./data" , train=True , download=True , transform=transform ) mnist_test = torchvision.datasets.FashionMNIST( root="./data" , train=False , download=True , transform=transform ) train_iter = torch.utils.data.DataLoader(mnist_train, batch_size=batch_size, shuffle=True ) test_iter = torch.utils.data.DataLoader(mnist_test, batch_size=batch_size, shuffle=False ) print ("数据集加载完成!\n" )
数据集加载完成!
使用torch.nn搭建模型
1 2 3 4 5 6 7 8 9 10 11 12 13 14 from torch import nnnet_nn = nn.Sequential( nn.Flatten(), nn.Linear(784 , 10 ) ) def init_weights (m ): if type (m) == nn.Linear: nn.init.normal_(m.weight, std=0.01 ) net_nn.apply(init_weights)
Sequential(
(0): Flatten(start_dim=1, end_dim=-1)
(1): Linear(in_features=784, out_features=10, bias=True)
)
定义损失函数和优化器
1 2 3 loss = nn.CrossEntropyLoss() optimizer = torch.optim.SGD(net_nn.parameters(), lr=0.1 )
标准化的训练流程
1 2 3 4 5 6 7 8 9 10 11 12 13 14 15 16 17 18 19 20 21 22 23 24 25 26 27 28 29 30 31 32 33 34 35 36 37 38 39 40 def train_epoch_nn (net, train_iter, loss_fn, optim ): net.train() train_l_sum, train_acc_sum, n = 0.0 , 0.0 , 0 for X, y in train_iter: y_hat = net(X) l = loss_fn(y_hat, y) optim.zero_grad() l.backward() optim.step() train_l_sum += l.item() * len (y) train_acc_sum += (y_hat.argmax(dim=1 ) == y).sum ().item() n += y.shape[0 ] return train_acc_sum / n, train_l_sum / n def evaluate_accuracy_nn (net, data_iter ): net.eval () acc_sum, n = 0.0 , 0 with torch.no_grad(): for X, y in data_iter: acc_sum += (net(X).argmax(dim=1 ) == y).float ().sum ().item() n += y.shape[0 ] return acc_sum / n train_losses_nn, train_accuracies_nn = [], [] test_accuracies_nn = [] for epoch in range (num_epochs): train_acc, train_loss = train_epoch_nn(net_nn, train_iter, loss, optimizer) test_acc = evaluate_accuracy_nn(net_nn, test_iter) train_accuracies_nn.append(train_acc) train_losses_nn.append(train_loss) test_accuracies_nn.append(test_acc) print (f'Epoch {epoch + 1 } , Train Loss: {train_loss:.4 f} , Train Acc: {train_acc:.3 f} , Test Acc: {test_acc:.3 f} ' ) print ("训练完成!\n" )
Epoch 1, Train Loss: 0.7877, Train Acc: 0.750, Test Acc: 0.757
Epoch 2, Train Loss: 0.5712, Train Acc: 0.813, Test Acc: 0.807
Epoch 3, Train Loss: 0.5243, Train Acc: 0.826, Test Acc: 0.798
Epoch 4, Train Loss: 0.5017, Train Acc: 0.832, Test Acc: 0.823
Epoch 5, Train Loss: 0.4850, Train Acc: 0.837, Test Acc: 0.820
Epoch 6, Train Loss: 0.4745, Train Acc: 0.841, Test Acc: 0.822
Epoch 7, Train Loss: 0.4654, Train Acc: 0.842, Test Acc: 0.831
Epoch 8, Train Loss: 0.4582, Train Acc: 0.845, Test Acc: 0.826
Epoch 9, Train Loss: 0.4516, Train Acc: 0.847, Test Acc: 0.829
Epoch 10, Train Loss: 0.4475, Train Acc: 0.848, Test Acc: 0.834
训练完成!
结果可视化分析学习结果
1 2 3 4 5 6 7 8 9 10 11 12 13 14 15 16 17 18 19 20 21 22 23 plt.figure(figsize=(12 , 5 )) plt.subplot(1 , 2 , 1 ) plt.plot(train_losses_nn, label='Train Loss' ) plt.title('Loss over Epochs' ) plt.xlabel('Epoch' ) plt.ylabel('Loss' ) plt.legend() plt.subplot(1 , 2 , 2 ) plt.plot(train_accuracies_nn, label='Train Accuracy' ) plt.plot(test_accuracies_nn, label='Test Accuracy' ) plt.title('Accuracy over Epochs' ) plt.xlabel('Epoch' ) plt.ylabel('Accuracy' ) plt.legend() plt.show()
通过torch.nn实现Softmax回归在Fashion-MNIST数据集上轻松复现并验证了从零实现的版本的效果。nn.CrossEntropyLoss则巧妙地将softmax计算和损失函数合二为一,使代码更简洁且数值上更稳定,最终结果显示,损失随着训练轮数下降,模型同样达到了理想的准确率。
校订记录(2026-10-09):本页从原文迁入后,依据 PyTorch 官方文档校正了广播与 torch.no_grad() 的说明;原始代码、实验输出和原文日期保留,未重新运行训练实验。参考:广播规则 、no_grad 。


评论
评论
留言服务尚未连接。
正在打开留言簿……